
One purification option is water distillation. This nifty process harnesses water’s fundamental nature: evaporation and condensation. By heating dirty or saltwater, steam rises leaving gunk behind. As the vapor cools and condenses, out comes pure, drinkable H2O.
In this post, I’ll show you how to build your own miniature distillation system with simple hardware store parts. We’ll walk step-by-step through constructing a portable purifier to turn dubious liquid into guaranteed safe drinking water using good-ole DIY techniques.
Materials Needed
Now we get to the fun part – acquiring our distillation materials! Don’t let this short list intimidate you. These are easily sourced components you can probably scrounge up in your garage.

Here are the vital ingredients in our water transformation recipe:
- Trusty Stainless Steel Bottle – this hearty vessel holds the questionable liquid we feed into the still. Any big Gatorade-type works fine.
- Copper Pipes – we shape this into a winding coil to capture and cool the sweet vapor. Shiny copper is the MVP of heat transfer.
- Stovetop/Heat Source – the external energy driving liquid to steam. A campfire, burner or even sunlight gets the job done.
- Collection Bottle – our purified payoff piping into any container. I use a clear bottle to gaze at the goods.
- Soldering Tools – only needed if securing the coil to the cap. Solder creates a solid bond.
- Compression Fitting – where the coil penetrates the lid, this fitting makes a water-tight seal.
With our ingredients acquired, we’re primed to manufacture some top-grade H20! The process sounds complex but truly only necessitates linking pipes and bottles creatively. The liquids do all the scientific heavy lifting!
Let’s commence kitchen chemistry with the build…
1. Installing the Copper Tubing
With materials prepped, we start fabrication by outfitting the stainless bottle lid – this is where the magic connector comes together.
First, whip out your power drill to carve a clean passage in the cap. We need an open canal for liquid to escape as vapor. Take it slow and steady to get the sized hole aligned to your copper pipe.
Next, scuff up the mating surfaces on lid and tube so solder can grab hold. A quick sanding with coarse grit readies the bonding spots. We’ll create a solid solder seal for our steam tunnel.
Firing up the torch, apply heat and solder generously around the penetration point. Take cautions not to scorch plastic threads. Let the metal meld and fuse. Our goal is watertight integration able to withstand pressure and heat.
Lastly, thread on the compression fitting over the tubing’s jaws. Tighten down the nut until snug. The right angle positioning allows fluid to divert while keeping our slim profile. Verify no loose leaks with a test run.
With some fiery fabrication, our steam portal is fully functional! The tunneled lid is prepped for vapor transport thanks to the power of soldered perseverance!
2. Wrapping the Copper Coil
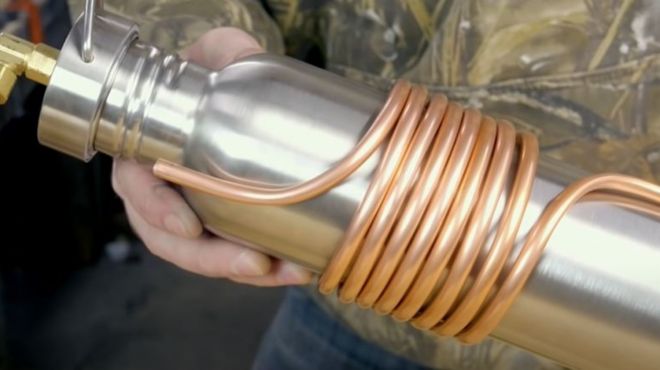
With our spout set, we wrap the copper tubing into a shaping winding coil. This acts as the “condenser” to cool the vapor back to liquid.
Take your length of pipe and tightly wrap around the bottle’s sides. Shoot for at least 8-9 snug twists to maximize heat transfer surface area. We want full contact for optimal cooling.
As you wrap, bend the tube ends to angle outward. Guide one end straight into our trusty compression fitting. Let the other dangle loose to drain our freshly distilled droplets!
3. Adding a Heat Source
The fun really starts when we spark up a heat source and watch water transform!
First, fill up the bottle with any water in need of purifying. Salt, dirty, funky? No worries with this all-cleansing process.
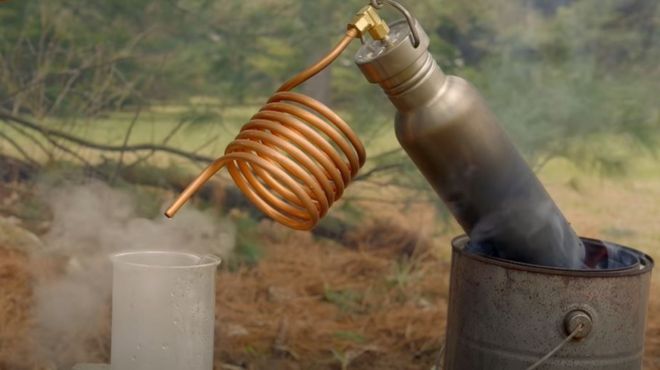
Next, place over flaming campfire, portable burner or even sunlight if very patient. The goal is sustained heat activating our enclosed aquatic ecosystem.
As things bubble, steam carrying only water molecules rises shedding any contaminates. This hot vapor snakes through our coiled piping rapidly shedding heat. Cooling ensues condensation into pure liquid dripping out the free ended tube ready for drinking!
4. Cooling the Condenser
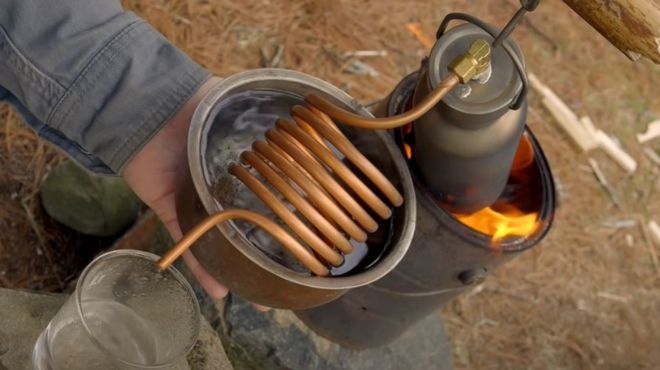
To amplify water production, we can optionally accelerate cooling. This condenses more vapor swirling through our copper cascades.
Some heat dissipation hacks:
- Soak rag in water and wrap around the coils. The wet fabric pulls more heat from the metal.
- Submerge the entire coil in a bath of cool water. Liquid contact whisks away warmth for max chilling.
Any cooling boosts yield faster distillate drops into our collection!
Why This Works
After construction, let’s appreciate this little water wizard:
- Portable & Cheap – Simple parts enable DIY anywhere for under $50
- Easy Assembly – Wrap pipes & solder, done! Great weekend project.
- Purifies Water – Distillation uniquely isolates pure H2O from any contaminants
- For Emergencies – Reliably clean water from risky natural sources
By mimicking natural hydrologic purification, we have inexpensive insurance whenever water runs low or dirty. That’s the beauty of fabrication – controlling nature for human benefit!
Wrapping Up
We’ve conquered creating your own mini water distillation dynamo! By combining simple materials from bottle to coil, steam’s power is harnessed to clean liquid.
The process miraculously filters water naturally through heat, evaporation, condensation and chilling. It’s incredibly useful anywhere drinkable water is scarce whether camping or enduring outages.
I hope by illuminating the easy construction steps, you feel equipped to build your own. Now go source parts, get fabricating and soon you’ll be drinking purified water from the most unlikely places!


