
Have you ever wished you could beat the heat without running up your electricity bills? Well, you’re in luck. It’s surprisingly easy to build your own solar-powered air heating and cooling system right at home using basic materials. In this post, we’ll explore how to tap into renewable solar energy to create an efficient, eco-friendly way to stay comfortable year-round.
The best part is, you don’t need fancy mechanical skills or precious metals to construct a working prototype. That’s because it utilizes basic components like a water pump, old car radiator fan, some flexible tubing, and a couple sheets of plywood. I was able to source everything I needed for about $70 bucks!
I’ll walk through how I built the frame, connected the water system, and wired in the solar panel power source. You’ll see firsthand how this super simple DIY air heating and cooling system efficiently regulates the temperature using basic materials. Let’s jump in!
Materials Needed
Before we begin the building phase, we first need to gather all of our ingredients. As I mentioned earlier, you can source everything you need for this DIY air system for around 60 to 70 dollars. Not too shabby!
Here’s a quick checklist of the main components you’ll want to get your hands on:
- Water pump – This will pump water from our reservoir through the system’s tubing. I picked up a small 80 GPH (gallons per hour) magnetic centrifugal model for around $20.
- Car radiator fan – Scour junkyards or eBay for a used fan. Just make sure it’s in decent working order. Expect to pay $10-15 bucks.
- Heat exchanger – I snagged an 8 x 8 inch model for about $15. This lets the pumped reservoir water absorb and release heat.
- Tubing – You’ll need some PVC tubing that fits your chosen water pump inlet and output diameter. Get 10-15 feet to start.
- Wood/tub for water reservoir – I repurposed an old plastic storage bin and some plywood scraps. But you can get creative sourcing materials for your frame and water containment system.
- 100W Solar panel – The crown jewel! This $50 powerhouse panel harnesses electricity from the sun to run the pump/fan.
As you can see, you can build a fully operational system without breaking the bank. For less than $100, we’ll have an eco-friendly way to effectively heat and cool indoor air using the limitless power of the sun!
1. Building the Frame
Now for the fun part – let’s start construction by building our system’s structural frame! Having a solid foundation is crucial to holding the pump, tubing, and heating/cooling components.
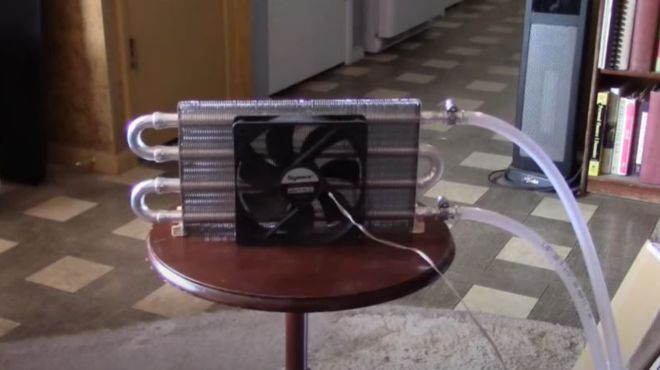
I was able to fashion together a suitable frame using some old 2×4 stud boards I had leftover from another project. You’ll first want to construct a box shape that provides enough structural integrity to house the heat exchanger and fan.
Be sure to measure properly before cutting an appropriately sized hole in one of the plywood sheets to snugly fit the diameter of your radiator fan. You’ll secure the fan over this hole which will pump air into the room once everything is powered up.
Next, strategically position the heat exchanger between the fan outlet and opposite side of the frame. Secure it tightly at angles that maximize exposure to the forced air the fan generates. We want to enable the pumped water enough contact time to transfer heat to or absorb it from the air stream as efficiently as possible.
The frame doesn’t need to be anything fancy, but should firmly stabilize all included components. Utilizing scrap materials is also a great way to save money and reduce waste. Our modest wooden frame will suit us perfectly.
2. Connecting the Water System
Now that our structural framework is ready, let’s shift gears to setting up the water circulation system. This pumped reservoir will transfer heat to and from the air stream via the heat exchanger.
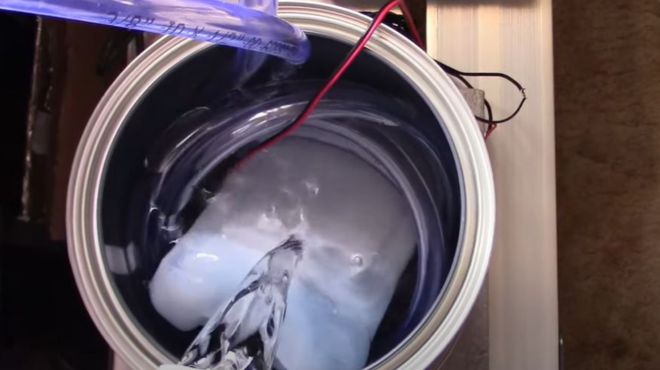
First, position your water-tight tub or bucket beside the frame. Submerge the water pump so its inlet hose can draw from the water bath.
Run an outlet hose from the pump along the frame up to the top inlet opening of the heat exchanger. Cut the tubing to the appropriate length using scissors or tubing cutters. Make sure the connections are sealed tightly in all areas – leaks are no fun!
As the pump circulates water, the heat exchanger will transfer thermal energy between the liquids and forced air from the fan. For heating mode, maintain water temp around 110-120°F. Or for cooling operation, 50-60°F works well.
You can achieve the desired reservoir hot or cold temps with combinations of hot water additions, frozen water bottles, aquarium heaters and chillers, etc. Get creative!
Ensure all hoses and connections are reinforced to safely contain the water flow during operation. Then, it’s showtime! We’re now ready to experience some solar-powered temperature regulation.
3. Adding the Heating Element
Thus far, we’ve built the structural frame, mounted the fan and heat exchanger, and connected the water pump and reservoir. Now let’s talk about optionally integrating an electric heating element to amplify the system’s heating capabilities.
I decided to wire in a 150 watt submersible water heater toward the bottom of the reservoir tub. This provides supplemental heat to get the water up to temp faster while also offsetting some heat loss through the tubing and exchanger during operation.
The heating element can either run off the solar panel’s extra capacity, or you can use a separate 110V power source like an AC outlet if available. Just make sure you have properly grounded and insulated any electrical wiring. Safety first!
With the inline water heater in place, the frame apparatus can now produce an impressive stream of warm air outward from the fan side. Monitor the water temp closely and adjust the heating element or amount of fill water to tweak responsiveness.
And there you have it! With around $100 in easy-to-source parts and materials, plus some DIY elbow grease, you now have a fully-operational solar-powered air heating system perfect for those chilly nights!
4. Installing the Solar Panel
What good is a solar-powered gizmo without a way to soak up rays from that great ball of gas in the sky? Let’s get our 100W solar panel hooked up!
Orient the photovoltaic panel on an exterior spot that receives direct sunlight for at least 6 hours per day. This allows adequate solar gain for operational capacity. Roof and southern/western-facing wall mounts typically work best in the northern hemisphere.
Carefully wire the DC output contacts from the solar panel to the input terminals on the pump and fan. If also connecting a heating element as discussed earlier, ensure the panel wattage can support the combined load.
Sit back and bask in the fruits of your labor as the transforming power of sunlight gets converted into usable electricity to run our heating/cooling system!
It’s incredible when you really think about it – photons from the sun get absorbed by the panel, dislodging electrons which generates a flow of clean DC current capable of churning that fan and circulating water. Nature truly provides some magical science!
With the panel installation complete, our renewable energy source can now cleanly power the heating/cooling system indefinitely into the future.
Why This System Rocks
After building this DIY heating and cooling setup and putting it through the paces, I’m impressed by how well it performs using basic components and self-supplied solar power:
Sustainable & Affordable – The renewable solar energy source combined with minimal electricity needs makes this an ultra low-cost system to operate long-term.
Adjustable Control – You can tweak the water temperature and flow rate to easily find that sweet spot for your particular heating or cooling comfort needs.
No Added Humidity – Unlike swamp coolers, this setup does not raise indoor humidity levels while lowering air temps.
Potential Downsides to Consider
While I’m definitely a fan (pun intended) of these solar-powered setups, they aren’t necessarily a perfect solution for all use cases. Here are some downsides to consider:
Requires DIY Effort – Certainly not as convenient as store-bought units; must have ability and willingness to source parts and construct.
Limited Capacity – The small-scale nature caps heating/cooling output compared to full-sized traditional HVAC systems.
Conclusion
If you’re looking for a starter green energy project with practical year-round temperature regulation benefits, building one of these solar-powered heat exchanger systems is sure to satisfy.
Not only will it provide supplemental heating or cooling, you’ll also learn valuable skills about thermal dynamics and harnessing natural energy sources.
You can customize and tweak aspects like the frame dimensions, fan/pump flow rates, and design aesthetics to perfectly meet your environment. And supporting the transition toward sustainable technologies feels pretty rewarding too!
With a few basic components, willing hands, sunshine’s thermal power, and some fluid dynamics wizardry, stay comfortable while keeping costs and resource use low. What could be cooler than that?


