
Rocket mass heaters provide an efficient, environmentally sustainable way to heat water and cook food without a single plug-in or propane tank. With just simple and affordable materials like clay, sand, and salvaged copper coils, you can build your very own rocket stove that’s powered solely by wood.
From creating a sturdy base frame to connecting the copper coil to your storage tank for an endless supply of scalding water on demand straight from the power of burning sticks, you’ll have all the details on hand to construct your own fully functioning off-grid hot water and cooking system with nothing but dirt cheap materials and your own two hands.
So if you want to liberate yourself from unreliable electric or propane-based systems and enjoy living life in an off-grid cabin, van, or any independent abode, then read on to learn how this innovative yet basic rocket mass stove set up can make living comfortably off-the-grid a reality.
Materials Needed
Now comes the fun part – gathering the goods to create your own rocket mass water heater and cooktop. Luckily, this project calls for common, dirt cheap materials you may even have lying around already:
Copper Coil – The flexible copper tubing allows water to pass through the heated interior to efficiently heat up. Scavenge some from old AC units or purchase affordable copper coils.
PVC Pipes – These handy plastic pipes will shape the internal air and fuel channels. PVC is extremely heat resistant.
Clay & Sand (Cob) – The ancient natural building mixture of clay, sand, straw and soil creates insulating thermal mass once it dries. Abundant and ecologically friendly!
Structural Supports – Scrap lumber or metal framing builds a base to shape the cob over.
Oil – Helps smooth removal of the PVC molds. Any vegetable oil or motor oil works.
Water Tank – Stores your heated water. A 50+ gallon drum is ideal depending on household size.
Firewood – Traditional cordwood keeps this renewable system fueled up. Any wood will do!
As you can see, you likely already have most of these supplies, or they are cheap to source locally. Way more affordable than costly solar panels! Now for the fun part….we get to play in the mud (literally) to sculpt the thermal mass core.
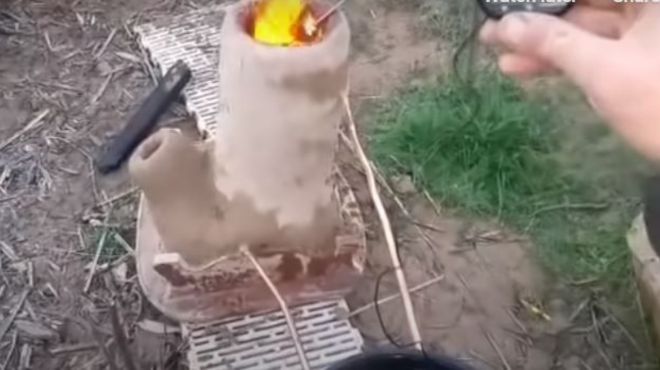
1. Building the Structure
Now for the fun part – we get to break ground on sculpting the body of the rocket mass heater so it can heat up water more efficiently than that old water tank gathering dust in your barn.
First, build a sturdy support frame out of either scrap lumber or metal pipes. This will form the shape for applying the thermal mass cob mixture over later. Make it about 4 feet tall and 2 feet wide, with an extra foot or two of height if you want additional cook surface area.
Next comes getting muddy! Mix up your cob blend of clay soil, sand, and straw to create a thick, moldable earthen plaster. Start packing this cob blend by the fistful onto your frame. Gradually build up layers until you achieve the desired mass shape and height for your stove.
Here’s a hot tip: press PVC pipes into the sides of the wet cob as you go to shape the air intake and fuel inlet channels. This saves effort versus sculpting them later!
Once your earthen sculpture takes shape, let it fully cure in the sun for at least a week until bone dry. Then carefully pull out the PVC pipes to reveal the air channels. Smooth any cracks with extra cob mixture and let dry again.
The framed earthen base of your rocket stove is now ready for the copper coils…aka the secret ingredient that makes heating water completely renewable!
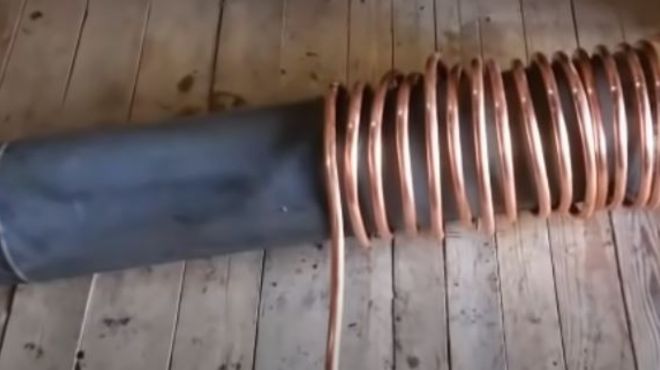
2. Installing the Copper Coil
Now for the secret ingredient that makes this stove “rocket”…the magical copper coils that will heat clean water just from burning wood!
Take another small PVC pipe and lube it up with some vegetable oil or engine grease. Then press this oiled pipe through the middle of the cob structure to shape the internal burn chamber which will cradle the copper tubing.
Next comes the fun part…you get to play plumber! Take your long copper tubing coil and carefully snake it into the carved out burn chamber within the thermal mass, coiling back and forth.
Make sure both ends of the tubing stick out – the bottom end will later connect to cold tap water intake, while the top end will feed out freshly heated water on demand! So keep these ends clear.
The copper serves to transfer the intense heat from the active fire chamber into the surrounding earthen mass, which acts like a thermal battery to steadily radiate warmth into the coils. Pretty clever heating solution for off grid living!
Now we seal up the coil…
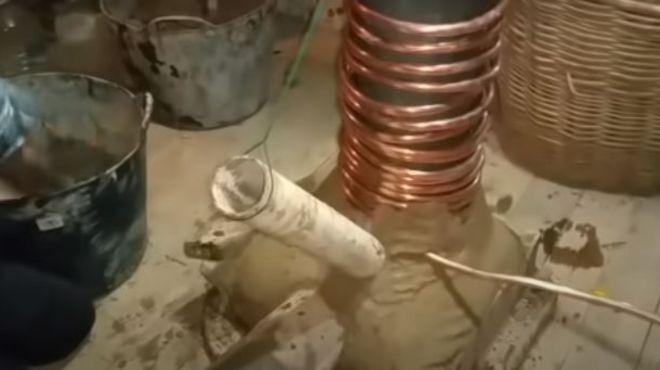
3. Encasing the Copper Coil
Now that the copper tubing is snaked throughout the inner chamber, it’s time to seal it up within the thermal mass cob insulation.
Whip up another batch of fresh cob mixture. Then pack it firmly around the chamber enclosing the copper coil, filling up the rocket stove body. As you pack in cob, press out any trapped air bubbles around the tubing. This ensures maximum contact with the surrounding mass to efficiently capture heat.
Leave the last 5-6 inches at the top free of cob to serve as a smooth cooktop surface. This will heat up nicely from the rising fire below.
Once fully packed with insulation, allow the wet cob to dry completely in the air for 5-7 days. The clay and soil mixture will harden like a ceramic as it cures in the sun.
Finally, put on some gloves and gently work the PVC pipe free from the hardened interior chamber. Try twisting back and forth without cracking the sides. This reveals the hollow burn tunnel, ready to accepts sticks and tinder.
Almost ready for off-grid luxury…now we just need to plug into the water storage!
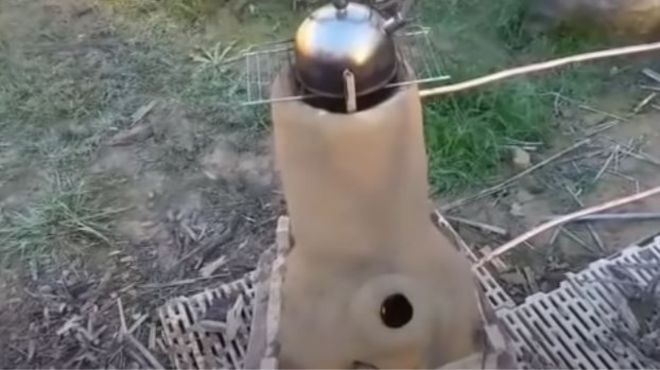
4. Connecting to the Water Tank
With the thermal mass rocket stove structure fully cured, all that’s left is connecting the copper tubing coil to an insulated water tank to passively heat clean water.
Start by running the intake end of the copper tubing (the lower end) to the bottom of your 50+ gallon plastic, metal, or even wood-fired hot tub. Securely attach this cold water intake line so it won’t come loose.
Next, take the hot water outlet end of the copper tubing (the top end) and route it into the top of the tank. Again, solidly affix in place with glue or fittings.
Now comes the cool part – thermosiphoning! This is a passive circulation where hot water rising through the coil pulls up colder water behind it, endlessly. No pumps required!
As the rocket stove blaze converts wood to heat under the cob enclosure, it steadily warms the surrounding mass, which gently heats the copper tubing. The upward rising hot water in the coil draws more water behind it from the tank bottom intake pipe. This creates a continuous passive circulation to bring cold tank water into the system, heat it, and return hot supply back to the storage tank just from gravity – how awesome!
So relax once finished…you’ve harnessed the power of nature to create endless hot water with zero electricity bills!
Reap the Rewards: Benefits of DIY Rocket Mass Heaters
After all the fun construction of your cob-enclosed rocket stove, it’s time to reap the steady rewards this simple yet clever system provides:
Extreme Fuel Efficiency – By slowly burning wood in a fully enclosed chamber, it converts nearly all wood energy into steady heat with little wasted smoke. Get over 80% heat capture!
Long Lasting Durability – The simple natural materials like cob and copper last for many years with minimal maintenance required.
Cook Food & Heat Water – The rocket stove flexibly serves a dual purpose in off-grid homes – cooking meals on top while passively heating large volumes of hot water around the clock in the coil.
Eco-Friendly – It recycles waste branches and scrap lumber that would otherwise be burned in open piles. Plus the system emits far less pollution than other cooking methods.
Taking It Home: Achieving Off-Grid Water Heating Freedom
From framing a base support structure to insulating the copper coil in heat-retaining cob…you now have all the steps needed to successfully construct your own efficient rocket mass heater for an off-grid lifestyle with the comforts of on-demand hot water and stovetop cooking.
Fueled solely by scrap woods in a closed combustion chamber, this simple yet smart system passively heats clean water in recycled copper tubing routed through the surrounding thermal mass. It requires no outside electricity or propane to run. Just the natural circulation of gravity and heat continually pushes fresh hot water for bathing and cleaning in any off-grid setting.
So spark your pioneer spirit and take the first steps today to start enjoying virtually unlimited hot water supplied straight from mother nature herself. The right rocket mass heater design provides reliable aquatic comfort allowing you to thrive more sustainably in an independent, off-grid abode.


