
Is your garage or workshop drafty and chilly even in early fall? Do you cringe when the heating bill arrives to warm an area you barely use? As a hobbyist woodworker, I’ve been in the same boat for years. But not anymore! I finally whipped up an incredibly simple DIY wood stove heater that keeps my two car garage nice and toasty using free materials sourced right from my backyard.
In this post, I’ll walk through how to construct a super inexpensive wood burning stove from an old propane tank that can heat a workshop or garage efficiently without any electricity required. I’ll provide step-by-step instructions to build the major components like the insulated body, custom heat exchanger, intake door and exhaust system. I’ll also discuss about placement tips and unexpected benefits I discovered from making your own heat source powered by nothing but scrap wood.
Even with limited metalworking experience, you can put together a sturdy workshop heater in two weekends using widely available tools and supplies. Let’s get started transforming that chilly workshop into a warm winter oasis! First up – understanding the surprisingly simple core stove components and critical design considerations…
Materials Needed
I know you’re itching to snag that welding torch and start sparking, but hold those horses! Before riding into metal shop chaos, we gotta get our ducks in row by compiling all the key materials. Don’t worry – no fancypants specialty items required here. I built my stove prototype using the basics listed below for less than $300 bucks:
- 55 gallon metal drum – You can nab these for free or cheap from auto shops, farms, food production plants, etc. Just confirm it’s food grade quality. We need thick steel walls to contain the heat.
- Blower fan – Find an inexpensive axial fan or old furnace blower to move air over the heat exchanger. Power and speed aren’t critical.
- Quarter inch steel plates (2) – Check your local scrap yard or hardware store. Dimensions depends on your drum dimensions.
- Eighteen 2-3 inch steel pipes – These will make up the heat exchanger to pump out warmth. Again, hit up the yard for leftovers or buy new.
- Welder and plasma cutter – Rent if needed, but having your own opens up endless project possibilities!
That’s the core materials checklist, but safety gear like gloves, goggles and a heavy apron are also essential. Don’t skimp on eye and body protection when dealing with intense heat and flying sparks!
Now for the fun part – let’s start slicing and melding this beautiful dumpster treasure into a lean, mean heating machine!
1. Preparing the Body
The whole stove build process takes about 5 core steps from start to finish. We’ll tackle them in detail one-by-one, but first up is fabricating the insulated housing that will contain our rip-roaring fire.
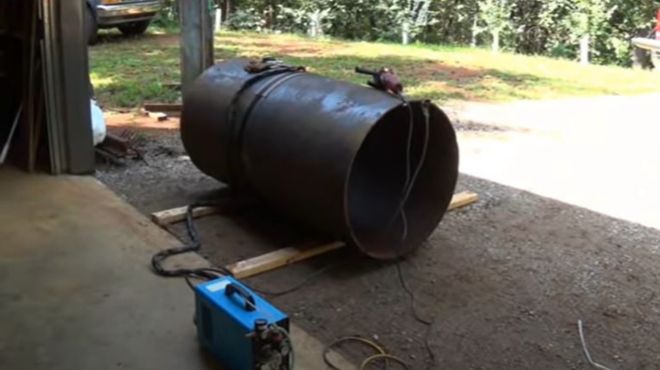
You’ll want an open workspace for this build. Things may get a bit messy! Start by scouring the inside of your 55 gallon drum to remove any residue. Safety first – wear gloves and a mask during cleaning.
Next, mark cutting lines 12 inches in from each end and use a plasma cutter to slice off both drum lids. You’ll want to leave the rounded tops intact to allow for our exhaust pipe later on. Put those cut sections aside to reuse material.
Finally, measure and cut a 30 inch section from the center of the drum to create the stove’s main body enclosure. The remainder can also be repurposed for the heat exchanger or other projects. Our snug housing is ready for some hot action!
With the insulating body prepped, we can move onto installing the inner guts – the all important heat exchanger that will pump warmth into your workshop…
2. Installing Heat Exchanger
The heat exchanger is the moneymaker component that transfers heat from the fire into circulating air to warm your workspace. Let’s get it fabricated!
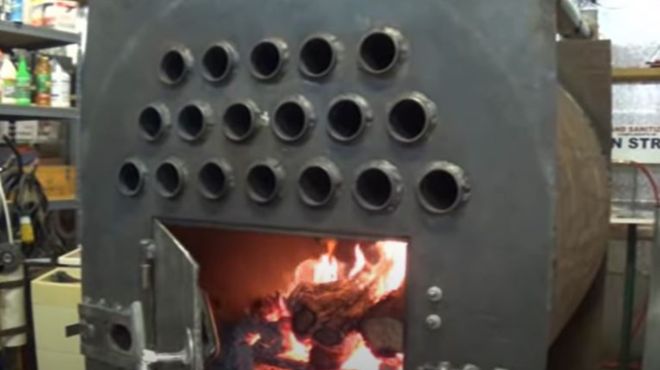
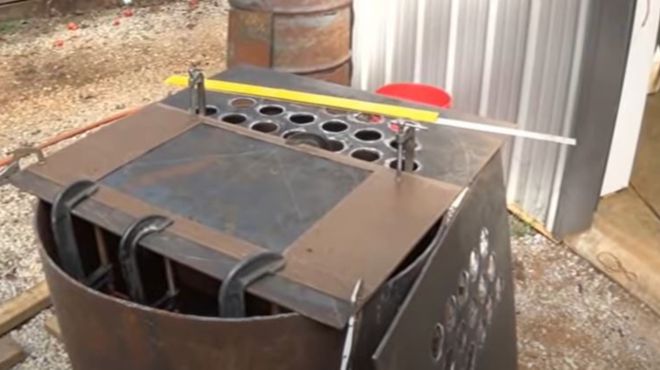
Start by measuring the inner dimensions of your stove body’s end walls. Cut your quarter inch steel plates to size and weld them onto the front and back ends, sealing up the body.
Next, mark and cut evenly spaced 2 inch holes in the steel plates – three across the top and bottom should suffice. Make sure to cut the holes completely within the perimeter of the plates to hold the pipes.
Grab your 18 smaller steel pipes, measuring around 24 inches each. Use a pipe cutter to trim and deburr the ends. Insert the pipes through the holes, fitting them snugly into the body. Space them evenly from side to side and top to bottom.
With everything aligned straight, tack weld the pipes into place on the inner and outer sides of the end plates. This will create rigid structure.
Once welded and cooled, test inserting scraps of wood through the door to ensure ample room. Our heat exchanger core is complete! Time to add the feeding door…
3. Making Intake Door
No wood stove would be complete without a feeding door to fuel the fire! Let’s craft one from our leftover drum sheet metal.
Start by measuring and marking an opening in the center front side of the body. For optimal airflow, it should match the full width between your heat exchanger pipes and stand around 16 inches tall.
Use a cutting blade to slice out this rectangular section. File down any burrs smooth. This opening will allow inserting and arranging logs.
Next, weld together a simple steel frame using more leftover flat strips that fits just inside the fresh opening’s dimensions. Be sure to fully weld along the corners and grind any sharp burrs.
With the frame solidly fused, align and tack it into place around the perimeter of the body’s new feed hole. Allow it to cool completely before handling.
We’ll add hinges and a locking mechanism after final assembly. But first, we need to expel all that heat and smoke…
4. Adding Exhaust and Damper
Without proper ventilation, our workshop heater would quickly fill with smoke. Let’s add an exhaust pipe and adjustable damper.
Start by measuring and marking a 6 inch diameter hole near the top of the leftover rounded end piece from our drum. Use a plasma cutter to slice a clean vent opening.
Next, weld a 6-8 inch steel pipe into this circular exhaust hole, angled slightly upwards. Make sure the interior opening sits flush with the interior drum wall.
Finally, use scrap sheet metal to fashion a basic sliding damper to fit snugly inside the angled exhaust pipe. Cut a handle in the plate for adjusting airflow manully.
Slide your new damper plate into the exhaust pipe channel. Close it about halfway to create sufficient draft. Adjust as needed once burning to control temperature.
Our final major component is a fan to circulate heated air into the room. Let’s get it installed!
5. Attaching Fan Blower
We need a way to actively circulate the air warming inside our heat exchanger. Enter a standard drum fan attached to the rear.
Start by cutting the remaining portion of our 55 gallon propane tank in half lengthwise. This will create a long panel perfect for mounting the blower.
Weld this drum panel along the back near the top exhaust opening. Place it about 2 inches below the exhaust outlet to allow rising heat to escape.
Center and mount a 12 inch blower fan inside this elevated rear panel using bolts or welded tabs. Heat protected metal flex duct can extend the output.
Angle the fan to blow air laterally the length of the body, shooting out the warm exhaust. This circulation creates convection to heat your space.
With all the major components fabricated comes final assembly! Let’s bring our workshop heater to life…
Why Build Your Own Workshop Furnace?
I know the upfront cost, tools and time required for this project may cause some hesitation. After all, you can buy a small garage heater for a few hundred bucks. Why go through the trouble of fabricating your own from scratch?
Well my friend, the benefits definitely outweigh the efforts:
Save Serious Cash
After building my heat exchanger wood stove, my gas heating bill dropped by 75% even during cold Vermont winters. The savings add up fast. Free fuel in the form of scrap wood is also great for the wallet.
Lower Your Carbon Footprint
Rather than relying solely on fossil fuel powered electricity or gas, you can heat your workshop primarily with carbon-neutral wood. It burns very clean, helps the environment and makes use of discarded scraps.
Effective for Well-Insulated Spaces
My DIY stove easily maintains 50+ degrees in my well-insulated two car garage even through below zero nights. Sealing air leaks is still important for efficiency.
No Electricity Required
Beyond the initial fan and power tools for building, my stove runs completely off the grid without any continuous electricity draw. That resilience offers serious peace of mind.
And those are just the functional benefits! This project also looks seriously badass and always draws curious questions from friends and family. Alright, enough chatter – let’s start slicing metal!
Fire It Up!
After a rewarding construction journey, our scrap wood burning stove is ready for action! Let me recap the key build steps:
- Clean and fabricate insulated body from a 55 gallon drum
- Install steel plate heat exchanger with vent pipes
- Cut intake door and weld on locking frame
- Add exhaust pipe through drum top and sliding damper
- Mount blower fan inside rear panel to circulate air
With all the fabrication complete, I suggest testing outside first before installing in your workshop. Start a small fire and feed it slowly, checking for any air leaks at welds or pipes.
Properly curing the materials will harden seals. Fine tune damper settings to achieve an inner temperature around 500 degrees that maximizes heat transfer yet avoids overheating.
Once seasoned, move your new stove inside and connect to workshop ducts if desired. My compact unit with basic blowers keeps a 400 sq foot garage completely toasty even through harsh Vermont winters!
I hope you’re as jazzed as I am to slash your heating bills while fabricating your own stylish, shop-warming wood stove from scrap. Stay cozy my friends – and happy welding!


