
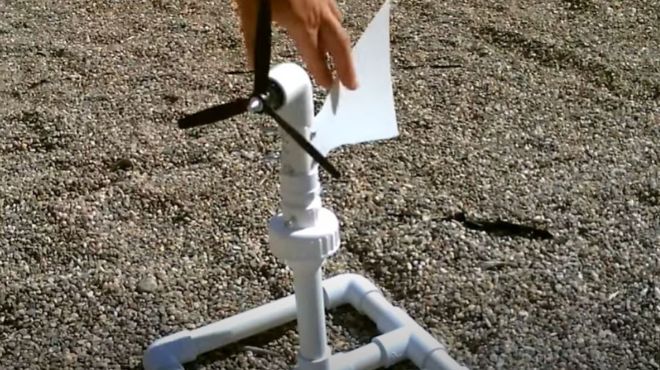
This homemade wind turbine is built using PVC pipes for the tower frame, a DC motor wired to produce electricity from the spinning, and plastic propeller blades that face into the wind.
Assembly involves cementing the PVC pipe framework, feeding wires through drilled holes, mounting the motor inside its housing, and attaching a swiveling head to allow tracking wind direction. Once completed, the wind turbine can generate renewable electricity to power lights, charge batteries, and operate small electronics using just the power of wind.
Plus you can build this wind turbine for under $50 in materials from your local hardware store. Let’s run through exactly what you’ll need and how to construct it step-by-step!
1. Materials Needed
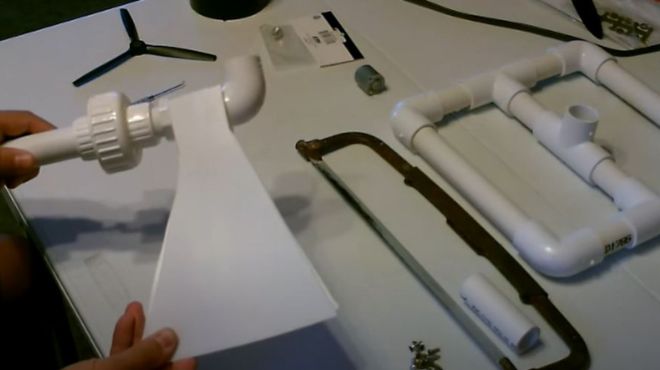
Gathering the parts for your homemade wind turbine is half the fun. This project primarily uses inexpensive and widely available pieces from any hardware store:
PVC Pipes You’ll need:
- 1 x 3⁄4” PVC pipe – 11” long (for main support)
- 1 x 3⁄4” PVC pipe – 8” long (for motor housing)
- 1 x 3⁄4” PVC elbow joint
- 1 x 3⁄4” PVC T joint
- 2 x 3⁄4” PVC endcaps PVC is perfect for this use because it’s lightweight yet durable for outdoor conditions.
Propeller Blades You can repurpose the plastic lid of a 5-gallon bucket as your turbine propeller. Or you can purchase a small DC motor propeller online or from a hobby shop if you want something more robust. Just make sure it’s correctly sized to fit over the mouth of your DC motor.
DC Motor A 3V 350ma DC hobby motor does the work of converting rotational force into electrical energy. Salvage one from an old toy or buy one for about $10. The RPMs will determine how much electricity it can generate.
Wires Finally, cut some lengths of wire from an old extension cord or other DC power source to connect your motor to your batteries/lights.
That’s it for materials! Now let’s start building. The PVC pipes form the base stand and body to hold everything together. Then we’ll wire and mount the motor and propeller before attaching to the stand.
2. Assembling the Turbine Body

The first step is using the PVC pipes, joints and cement to construct a stable base and support pipe that will hold your wind turbine upright.
Connecting the Base Start by cementing a T joint to the middle of the 8” PVC pipe. Then cement an endcap on one end and the elbow joint on the other. This forms the base stand. Make sure the joints are fully set before going to next step.
Adding the Support Pipe
Next, cement the 11” length of 3⁄4” PVC pipe into the opening of the elbow joint. This will serve as the vertical support to hold the motor and propeller. Let the cement dry completely so the pipe remains vertically straight up.
Creating Stability
To improve stability, fill the base tube with packed sand before cementing the final endcap. This lowers the center of gravity. You can also drive a piece of rebar into the ground and slide the base tube over it to anchor your turbine during storms.
Check that your 11” support pipe stands perfectly perpendicular straight up from the base. Any bend or lean will increase wobble when spinning.
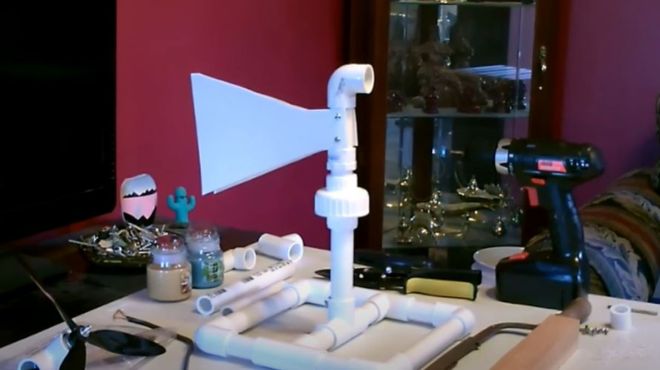
Now your PVC wind turbine body is complete! Just this simple PVC framework will enable catching the wind. Next we’ll add the electrical components and propeller.
3. Electrical Connections
Now for the fun part – wiring up the motor and turbine! This involves just a few key steps:
Drilling the Support Pipe Use a 1” drill bit to bore a hole near the base of the 11” vertical support pipe. This allows running wires from your motor inside to connect to a battery or lights.
Soldering Wires Solder additional lengths of wire to the existing positive and negative wires coming from your 3V DC motor. This extends the wiring so you can feed it through the support pipe.
Feeding the Wires Carefully feed the soldered wires down from the top of the support pipe and out the 1” hole at the base. Pull the wires till the motor reaches the top edge.
Mounting the Motor Before cementing, test fit your motor housing pipe over the support pipe to determine insertion depth. Apply duct tape if needed to tighten the fit over the support pipe. The motor should then be able to nestle directly centered at the top opening.
Secure the motor by cementing the 8” motor housing pipe over the support pipe’s exposed top portion. Allow to fully cure before continuing.
Now your electrical components are ready to generate power!
4. Attaching the Blades
Your wind turbine transforms wind energy into electricity via the propeller blades attached to the motor. Follow these steps to affix the blades:
Wrapping the Motor
Wrap duct tape around the mid-section of the motor until it fits snugly into the opening of the 8” motor housing pipe. The tape provides friction to transmit motion from the propeller to the motor.
Attaching the Propeller
Slide your propeller blades onto the motor shaft before fully inserting the motor into the pipe housing. Attach using the set screw hole on the shaft or glue in place. Ensure a tight blade fit – any wiggle reduces energy transfer.
Now your propeller turbine head is ready to catch the wind and start spinning!
5. Building the Swivel Assembly
Allowing your turbine to pivot prevents too much torque from building up. Attach a swivel so it can turn freely to track the wind.
Materials Use a 1⁄2” PVC pipe section, two elbow joints and an end cap to build a rotating swivel head. Cement it onto the motor housing pipe over the exposed top area.
Prevent Overspin Drill a hole through both PVC pieces and insert a bolt to stop rotation at 180 degrees. Keeps your power cables from getting tangled!
Your wind turbine is now fully assembled! Just face it into the wind and watch your propeller blades begin whirling round and round, generating clean electricity.
Time to hook up devices and try out your handmade wind generator!
Benefits of a DIY Wind Turbine
Constructing your own micro wind turbine from PVC provides several helpful benefits:
- Generates Renewable Electricity The electricity produced can power LED bulbs, charge batteries, and operate small electronics. Every watt your turbine generates means one less watt pulled from the grid.
- Learn About Wind Energy By building a wind turbine yourself, you grasp exactly how wind gets converted into electrical energy to power devices. Understanding these principles can inspire even larger renewable energy projects.
- Uses Common Materials This project relies on basic PVC pipes and joints, making it very cheap and accessible. The ability to fabricate wind energy with simple hardware store supplies is empowering.
video below explains the entire process
Conclusion
Building your own electricity-producing wind turbine is a fulfilling, eco-friendly project using materials you likely have on hand.
In this blog you learned key steps like:
- Assembling the turbine base from PVC
- Wiring and mounting the motor
- Attaching propeller blades
- Constructing a swivel mount
The benefits of generating your own wind energy are also clear. Powering devices from this turbine reduces grid dependence, saves money, and helps the environment.
Hopefully this guide has demystified the fundamentals of converting wind rotation into electricity. Apply what you’ve learned here to expand and improve upon this design. We welcome you to join legions of backyard tinkerers in the quest for renewable, self-sufficiency. Happy turbine building!


