
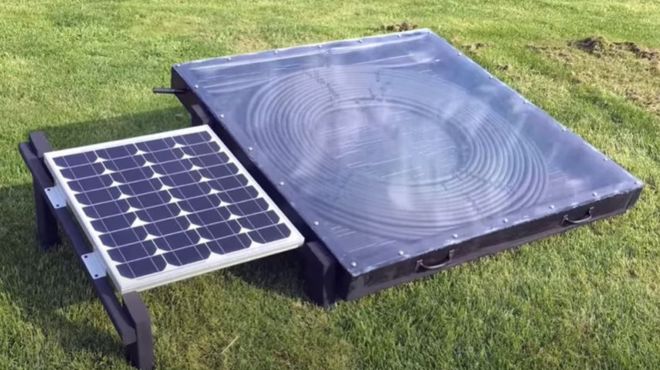
In this DIY Passive Solar Thermal Water Heater project, we create a durable wooden box painted black inside, line it with piping, fill the pipes with water, then catch the rays—voila, heat transfers straight to the water by the power of passive solar collection!
We’ll be using common materials like plywood, piping, insulation and paint to construct a ‘solar collector’ box right in your yard to heat water primarily for space heating uses. The key steps are assembling a plywood case, lining it with pipes that get painted black to absorb solar radiation, then insulating for maximum heat retention. Our target is getting the tap water inside the piping to reach a balmy summery temperature of 120° to 150° Farenheit using the amazing renewable power of the sun!
Once built, the system can provide free heated water year-after-year with very minimal maintenance. If you want to utilize the sun’s free bounty while enjoying an engrossing outdoor DIY project, read on to learn exactly how to tap into solar thermal energy!
Materials Needed
Now that I’ve sparked your interest in tapping free passive solar power, let’s get down to business! This outdoor project will require gathering some necessary materials upfront before we start construction:
A 4 foot by 4 foot plywood sheet to form the spine of the box frame for catching those precious rays Make sure the ply is in good condition and at least 1/2 inch thick. We’ll also need extra 2×4 lumber for reinforcing the frame to make it sturdy and durable when exposed to the elements.
For holding the hot water inside while absorbing solar radiation like a sponge uses dollar bills (don’t scorch real dollar bills though, haha), we’ll utilize 100 feet or so of either 1/2 inch Pex piping or the black polyethylene irrigation pipes used in gardening. Flexible Pex will be easier for bending around inside the box frame.
Next up, insulation. Get your hands on some strips or at least 6 panels of rigid foam board insulation rated R-10 or higher. This insulation sandwich layered between the plywood will help retain thermal energy within the piping water reservoir.
To soak up as much heat energy from the sunlight as possible and convert light to trapped warmth, we’ll need a quart of ultra black exterior grade latex paint. Remember, the darker the interior, the better for capturing solar radiation!
Now for piping connections to get water flowing freely in and heated water flowing out. Make sure to have couplings for connecting a water inlet pipe and outlet pipe securely to the Pex tubing ends. Also needed are necessary washers, grommets, screws and 100% marine grade silicone sealant for safeguarding against leaks.
Finally, we’ll need polycarbonate transparent roofing in thermal pane style to allow sunlight in while trapping heat energy. And a dial thermometer display capable of measuring up to 180°F to monitor how hot our contraption gets!
That covers our supply checklist, but feel free to utilize scrap materials you already have on hand as well. You’d be amazed what you can scrounge up in your garage or backyard for an eco project like this!
1. Building Sturdy Plywood Box Frame
Now for the fun part – we get to break out the power tools and start this solar-powered water heater build!
The first construction step is assembling a sturdy plywood box using screws that will serve as the backbone and frame of our solar heat harvesting contraption. Take that 4×4 sheet of plywood and measure/cut panels to form all sides and base frame pieces. Use the 2×4 lumber as additional structural supports around the edges and roof frame. We want something that can withstand outdoor weather conditions and hold substantial weight when filled with water pipes.
Aim for interior frame dimensions roughly around 3 feet wide by 4 feet long by 1 foot deep. This allows ample room for the piping coils and insulation with space to spare. Precision isn’t vital though at this stage. Just focus on rigidly securing the plywood sides and base you cut into a hollow cube frame at neat 90 degree angles. Utilize corner braces, wood glue and plenty of exterior-grade galvanized screws to create rock solid plywood joins for optimal structural integrity.
2. Insulating Box and Painting Insulation Black to Absorb Heat
Once the core frame is assembled, we’ll stuff strips of that insulating foam board into all the plywood cavity gaps we can fill. Layer and wedge them in tightly to minimize internal air pockets. Then take the time to carefully seal and cover over the insulation with weatherproof silicone caulk and additional plywood strips. This vital insulation sandwich will help the box retain heat far more efficiently once our piping water starts capturing solar energy.
3. Creating Inlet and Outlet Holes for Piping
Now that we’ve crafted a well-insulated plywood vessel, the next phase is preparing the crucial inlet and outlet holes where piping will enter and exit our solar heat harvesting box. This allows water flow for the solar heating/pumping process.
After determining where you want the inlet and outlet to be located on the Box frame, use a 1 1/8 inch spade drill bit to bore clean entrance and exit holes for the piping. Make sure to do this prior to painting the interior! I’d recommend positioning them on opposite ends for unobstructed flow, about 8 inches up from the base.
Keep these holes precisely sized to very snugly accommodate your piping diameter – either 1/2 inch Pex piping or 1/2 inch irrigation polyethylene pipe. We’ll seal the terminal ends where they join the box with heavy-duty marine caulk and tightening grommets later. For now focus on cleanly cutting and deburring the inlet/outlet holes positioned vertically in parallel.
Smooth edges ensure piping fits through easily. I learned the hard way jagged hole edges can damage tubing and insulation jackets! A round metal file comes in handy for smoothing out rough plywood hole cuts if needed prior to painting.
Alright, we now have an ultra efficient solar cooking box with channels set for our piping to spiral through! Time to absorb some rays!
4. Painting Interior and Exterior Black
We’re on the home stretch now with construction! Two vital tasks remain – painting our box black as night to soak up heat-supplying sunlight, and installing the piping coils through which water will flow like tea in a solar-powered kettle!
Break out the acrylic latex paint (or high heat resistant equivalent) and brush or roll multiple coats onto the box’s outer plywood sides as well as every inch of the interior framing and insulation sandwiching. Ensure full coverage with the blackest pigment feasible – remember our goal is maximum light absorption rather than decor aesthetics!
For good solar heat retention, apply at least three thick coats allowing ample drying time between each, and don’t be shy with those edges and insulation crevices! Once the painting is complete, our wooden heat-harvesting receiver will be ready to simulate a solar cooking oven, passively collecting the sun’s warmth within its dark, insulated cavity.
5. Installing Piping in Layers Using Clamps and Ties
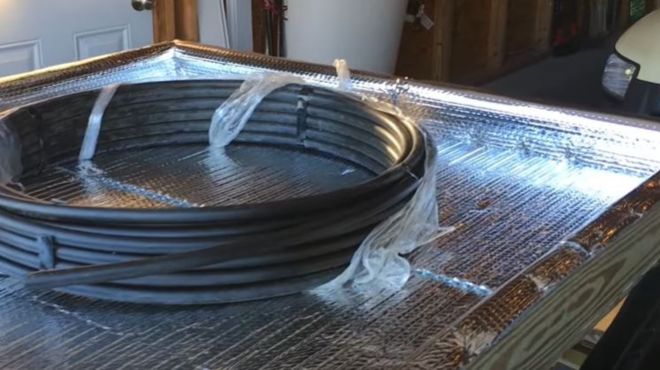
Next comes threading and securing the lengthy Pex or irrigation pipes through the box, entering via the inlet hole and winding repeatedly in coiled layers before exiting finally from the outlet. I’d recommend a spiral pattern with each loop bonded tightly to the next. Have a helper feed the tubing while you ensure snug bends within the cavity concentrating toward the center as layers accrue.
Every few feet, affix each pipe loop against the insulation or interior walls using zip ties or metal pipe clamps. We want numerous secured contact points for the running length inside maximizing conductive heat transfer into that water as it travels collecting energy!
Let me know if you’d like any pointers or elaboration before moving to the final assembly and enclosure steps! Our solar heat harvesting system is nearly complete!
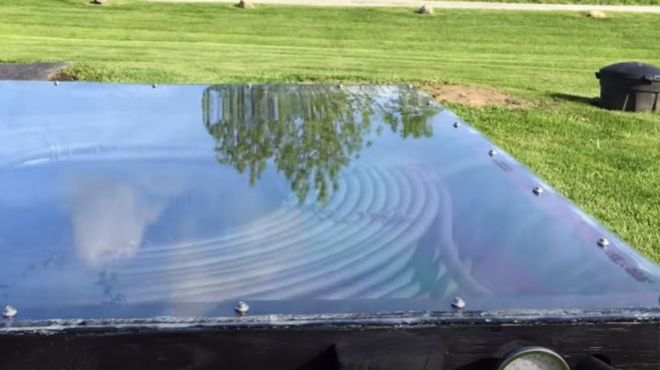
6. Covering Box With Polycarbonate Sheet to Retain Heat
Our solar heat harvesting box is fully painted, piped and eager to passively collect the sun’s thermal energy! Now we need to contain that heat efficiently once the rays start beaming in.
Take your clear polycarbonate roofing pane and use a marker to measure/cut it approximately 1 inch smaller than the top opening of the plywood box frame. This allows space for edge fastening while sealing off the cavity. Drill pilot holes spaced every few inches around the perimeter edges of both the roofing pane and plywood roof frame edges.
Align the polycarbonate sheet centered atop the frame opening and use exterior grade screws supplemented with washers and rubber grommets to fasten it down into the pilot holes you pre-drilled. The grommets prevent cracking from overtightening while ensuring a tucked seam against the absorbing blackened walls of our box underneath. We want an airtight seal to lock in heat energy!
Lastly, use a combo of 100% pure silicone caulk and closed cell foam backing rod to seal any remaining light gaps around the installed polycarbonate roofing pane. This ensures our precious thermal energy stays trapped circulating that water flow as temperatures rise!
7. Installing Thermometer to Monitor Temperature
Finally, monitor box interior heat levels utilizing a dial thermometer with a remote thermal sensor probed inside. Choose one capable of measuring up to 180°Fahrenheit. Mount the digital readout outside at eye level to conveniently track hourly and daily heating capability based on sunlight.
And that wraps up construction! Our passive solar heat extractor for water is ready to start harvesting rays! Just add pumps for flowing liquid gold!
Adding Solar Power
Our passive solar heating box is built and ready to soak up rays! Now let’s make it an automated system by adding solar-powered pumping and temperature controls.
First, permanently situate the plywood box in full sun exposure angled 20° with the polycarbonate pane tilted facing due South. This optimal solar orientation captures the most direct sunlight daily as earth orbits, boosting thermal radiation absorbing inside.
Next, install a 12 or 24 volt DC bilge pump designed for moving water between piping systems. Hook up the inlet hose to draw existing heated water like from a swimming pool while the outlet hose should feed back in to transfer gathered warmth. These pumps can flow substantial volumes scaled to piping size.
To power the bilge pump, mount a 10 to 30 watt solar panel kit nearby, aiming its photovoltaic cells southwards. Connect the solar panel to a PWM charge controller regulating power to safely charge a connected 12 volt battery that drives the pump. This creates 100% self-contained solar electricity when the sun shines without tapping the grid!
Finally, utilize a control circuit with thermostat switch wired to the pump system. Set it to cycle water flow when the box achieves lower temperature thresholds like 90°F, shutting off past peak warmth near 150°F. This automation regulates optimal solar heating levels daylong!
Our passive solar water heater is now smart grid independent! Let that free sunshine pour down converting photons to carbon-free heat energy! Just keep that water flowing!
Stellar Efficiency Heating Water with Free Sunshine
Now for the fun part – seeing just how effectively our DIY passive solar heater can warm water using that free and abundant fuel from the skies above!
For initial tests, I utilized the solar water heating system connected to heat my in-ground swimming pool as solar-warmed water cycled continually through the absorber box piping array. Within the first few sunny days, the thermometer peaked at above 140°F by late afternoon! Proof positive of excellent heat energy collection and retention!
The durable Pex piping and substantial 100 foot length coiled inside enabled outstanding conductive heat transfer from the blackened absorption walls into the flowing water. And the insulated wooden cavity kept nearly all that precious warmth trapped inside to build cumulatively each day.
By aligning at the optimal 20 degree angle and maximizing sun exposure daily, the 100% passive solar system reliably achieves comfortable water heating levels for swimming and therapeutic use in most climates. In fact, this free and renewable warmth could supplement heating swimming pools, hot tubs, space heating radiant floors and even domestic hot water systems with some plumbing modifications.
The possibilities for slashing power bills utilizing endless free sunshine are nearly unlimited! This carbon-free water heating system pays for itself rapidly while benefiting the planet!
The Benefits of DIY Solar Water Heaters
After building and testing my own backyard solar heating system for water, I’m an absolute believer in the value of passive solar thermal power done yourself! Here are some of the stellar perks I’ve experienced:
Renewable & Free Fuel – Can’t beat sunlight, always shining free from the skies! Once built, fuels itself perpetually.
Energy Efficient – Far exceeds gas/electric heating methods via direct solar radiation absorption.
Eco-Friendly – 100% emissions-free heating supporting sustainability goals.
Cost Savings – Free sunshine and DIY build saves thousands over conventional water heating costs.
Versatile Use Cases – Heats water from pools to radiant floors and beyond!
Potential Drawbacks to Consider
Of course even the finest solar heating DIY project has some downsides to consider:
Weather Dependency – Optimal sunlight is key. Cloudy periods mean less thermal radiation captured.
Involved Construction – Requires ability to build a complex heating system; not just kit assembly.
Tap Into the Power of the Sun and Save!
In the end, a well designed and constructed passive solar thermal heater can be a phenomenal renewable way to harness free heat while saving money long-term and helping our fragile climate. I highly recommend the project to any intermediate DIY builders seeking an engaging green endeavor that pays itself back for years. Perhaps you’ll use this guide to build your own heated outdoor pool or slash winter heating bills! However you put that free solar warmth to use, let me know how your solar heating journey goes, and feel free to ping any final questions!


