
Have you noticed your old laptop has been plugged in more often lately? Those aging batteries just can’t hold a charge like they used to. Before heading out to buy costly new replacements, what if there was a DIY way to reuse those old batteries for green power projects instead?
In this post, I’ll give you a sneak peek into how I upcycled a bundle of retired laptop batteries into a handy emergency power backup system for my home. By wiring together just 26 reused batteries, I was able to create a sustainable 72AH/24V battery bank – enough juice to keep my essential appliances running for hours when the grid power fails.
So what convinced me to revamp these left-behind cells nobody wanted rather than tossing them out? For starters, repurposing e-waste for DIY energy storage can save a chunk on costs compared to buying new. Even better, giving worn out li-ion batteries new life aligns perfectly with my eco-values. Though slimming down my energy footprint is reason enough to feel good about this project, having 1.7kWh of portable backup power at my fingertips makes those occasional blackouts no worry at all!
Let’s dive in and unlock the process of tapping into those dormant batteries headed for the junk pile. With the right knowledge, anyone can upcycle laptop discards into a robust emergency power source. I’ll cover all the nitty gritty details – from figuring out how many cells you need to safety considerations. By the end, you could have your own rechargeable 24V lifeline waiting in the wings!
Materials Needed
Now that I’ve sparked your interest in squeezing more life out of worn-out laptop batteries, let’s run through exactly what you’ll need to set up your own emergency backup power supply. Most of the components are easily sourceable for anyone looking to get crafty with e-waste.
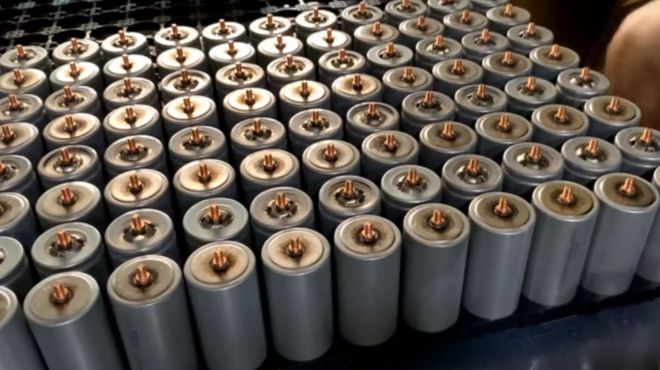
The Batteries: The stars of the show – those discarded 3.7V li-ion cells you pulled out of an aging laptop battery pack. I used 18650 cylindrical cells with 2,800mAh capacity, but any li-ions from tablets, phones, or batteries will work. Just be sure to check voltage and capacity.
The Housing: An ammunition can or other non-conductive sturdy box to enclose the wired battery segments. I preferred a rugged ammo can for protection.
The Control Center: A battery management system (BMS) is crucial to regulate voltage and charging to prevent fire or battery damage. Opt for one made for li-ion with a capacity that matches your pack.
The Connector: A spot welder securely connects the positive and negative terminals between parallel battery groups, while fuse-fitted nickel strips safely link each series segment.
The Rest: Wire, thermal pad insulation, a waterproof on/off toggle, perhaps a voltmeter to monitor energy levels. I’ll provide references for the specific parts I used later.
While sourcing discarded li-ion cells may require some digging through the recycling bin, the rest of the components are surprisingly affordable. Even with having to purchase a few supplies, reviving e-waste batteries for backup energy still works out cheaper than installing commercial solutions.
Now for the fun part…let’s get these cells prepped and packed with power!
1. Figuring Out the Cell Configuration
With our supplies in place, it’s time to map out how we’ll interconnect the 18650 cells pulled from laptop batteries to achieve the target 24V system voltage.
Based on using cells with an average 3.7V rating, wiring batteries in a series configuration boosts the voltage while parallel groups increase capacity.
So for a nominal 24V output, I would need:
182 cells total Arranged into 7 groups of 26 cells wired in parallel (7S26P) Then interconnect each of those 7 segments of 26 cells in series This 7 series blocks x 26 parallel cell formation allows the 3.7V cells to stack their voltage potential up to 25V when fully charged (3.7V x 7 = 25V).
Meanwhile, paralleling 26 cells in each series group expands the capacity to 72AH (2800mAh x 26 = 72,800mAh or 72.8AH).
In plain terms, the 7S26P wiring blueprint lets us combine enough reusable lithium-ion cells to store around 1.7kWh at a usable 24V DC output – sufficient for powering appliances, charging devices, and lighting during an outage.
With the cell configuration math done, it’s time to break out the spot welder and start marrying these batteries together to build our backup powerhouse!
2. Connecting the Cells
With our cell configuration mapped out, it’s time to start building the 25V 72AH battery packs from the harvested 18650s.
As mentioned earlier, I sourced by batteries from recycles laptop battery packs, snagging a batch of Samsung 2800mAh cells. While capacity will vary, the wiring principles remain the same.
Before handling li-ion cells, it’s paramount to use insulating wraps on each cell for safety. I covered each cell in adhesive-lined heat shrink tubes to seal out moisture and avoid shorts.
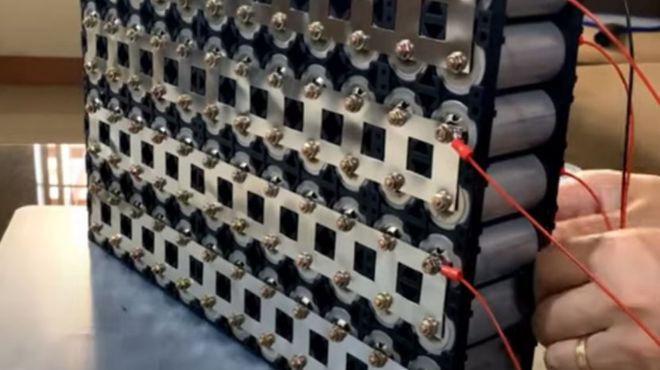
Referencing the 7S26P wiring plan, I first connected 26 cells in parallel using nickel strips to link the positive and negative terminals. Fuses act like circuit breakers to protect each parallel group.
Once all 26 cell segments were connected in parallel, I used more fused nickel strips to interconnect each 26P group end-to-end in series. This created the 7S arrangement to step up voltage potential.
Following this parallel then series grouping, I successfully formed the full 25V battery bank with 72.8AH capacity – ready to handle substantial loads during grid failures!
With safe handling and strategic wiring, those once discarded laptop batteries came together into a robust off-grid power source! Now to add some finishing touches to complete the build…
3. Completing the Series Connection
With all 26 parallel cell segments created, it was time to complete the series connection to build the entire 25V portable power bank.
Safety first! I installed narrow fuse wire strips between each group of 26 cells wired in parallel. This adds a protective fuse safeguard to cut power to any parallel section if issues emerge.
I interconnected the positive terminal of the first 26P segment to the negative terminal of the second 26P group. Then linked the positive of the second pack to the negative of the third…all the way down the line.
This chained each 26P module end-to-end in series, incrementally increasing voltage potential as they build on each other. By the sixth parallel pack, I was starting to see the voltage climb from the base 3.7V of each li-ion cell.
Lastly, I fused and soldered thicker gauge wire leads with an XT90 connector to the positive and negative endpoints – completing the 25V portable battery array!
With all 182 cells strategically wired in a 7S26P arrangement, I successfully transformed reused laptop batteries into a 72AH/25V off-grid powerhouse!
Now to add some protective housing to this e-waste battery bank and get it prepped for portable power supply capabilities…
4. Connecting the Battery Packs
With all the intricate wiring handled, it was time to assemble the 7 sub-packs of 26 parallel cells into one cohesive battery bank.
I stacked each 26P segment flat atop the next, using fuse-fitted nickel strips to bridge the positive and negative terminals between the separate packs to complete the series connection.
For insulation and rigidity, I cut plastic sheets to sandwich each layer of battery segments. This electrically isolates the packs while holding everything tightly together.
I also added small strips of double-sided thermal pad tape underneath and between each battery row to act as a cushion and dissipate heat.
After shaping the plastic sheets around the contours of the build, I wrapped it securely with Kapton adhesive tape. This added another protective barrier while keeping everything compact and constrained.
While complex battery banks would typically be professionally assembled, these simple insulation and stacking techniques worked perfectly to stabilize the cells so I could focus on the fun stuff – like customizing an enclosure and power management system!
5. Connecting Terminals
With all the battery segments fused, stacked, and secured – the last bit of wiring was connecting terminal leads to tap into my homemade power bank.
I added beefy 8AWG silicon coated copper wire to extend the positive and negative endpoints of my assembled battery rows out to an XT90 anti-spark connector.
This connector allows safe linking to devices drawing high discharge current without risking dangerous sparks.
I soldered and reinforced the terminal wire connections to ensure robust contact, wrapping connections in heat shrink tubing for protection.
After securing the wires in place with zip ties, I covered all remaining nickel strip interconnects in electrical tape to prevent accidental shorts.
With sturdy copper leads terminating in a weatherproof XT90 plug, I could safely tap into the 25V bank to transfer power in or out – whether recharging the cells from solar or running appliances off the battery.
Now that access to all that renewable power was locked in, it was time to fine-tune the management and safety…
6. Installing the BMS: Smart Battery Protection
With the battery bank fully wired, I needed to install a brain to monitor voltage levels and ensure safe operation – enter the battery management system (BMS).
A BMS acts like a miniature computer to regulate charge and discharge activity and provide crucial protection. I chose a suitable BMS for lithium-ion batteries to handle the power capacity.
After bolting the BMS to the positive terminal nickel strip, I carefully connected narrow sense wires from the BMS to tap into the voltage level at each set of 26 cells in series.
This allows the BMS to monitor and balance the state of charge across each series group to prevent overcharge or low voltage situations.
As a final safety net, I wrapped the assembled battery rows in adhesive-backed fiberglass insulation. This electrically isolates the pack and adds a heat/fire resistant barrier for good measure.
Outfitted with thermal protection, autonomous charge regulation, and voltage oversight – my e-waste battery bank was now smart-grid ready!
7. Fortifying the Ammo Box Housing
To enclose the battery build, I chose a durable yet portable ammo box to house all the components. The rugged sealed containers are also non-conductive – perfect for holding live power sources!
I first lined the bottom with 1/2 inch plastic sheet as insulation between the batteries and metal casing.
After drilling a hole to thread the battery terminal wires out, I was ready to load in my custom recycled battery for final assembly!
The ammo can provided a protective portable enclosure to contain the build – allowing mobility for powering devices outdoors or temporary placement wherever needed.
Now for the fun finale…activating this e-waste energy storage unit to start powering devices off the grid!
8. Installing the Battery Bank
The moment had arrived to install my handcrafted 1.7kWh battery bank into its new ruggedized home for mobile off-grid power!
I started by securely placing the battery rows with their protective wrapping into the plastic-lined ammo can. I positioned the segments flat to maximize usable interior space.
Next, I reconnected the BMS balance wires and main discharge lead to corresponding nickel strip terminals on the battery array. I also linked BMS communication cables to allow monitoring through an external display.
For extra insulation and vibration resistance, I cut sections of closed-cell foam to tightly sandwich the battery on all sides within the case. Pressure fitting the foam pieces immobilizes the cells while absorbing physical impacts.
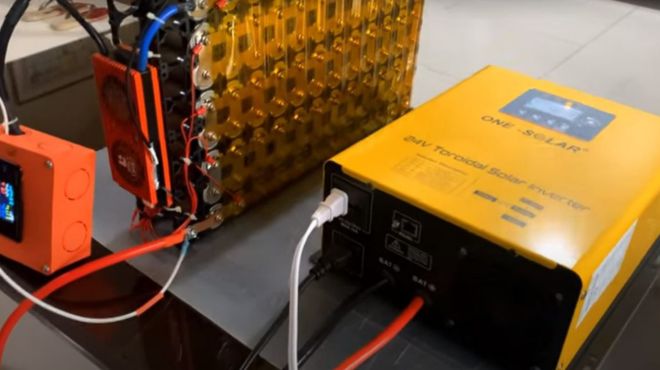
After loading in the battery components, all that remained was securing the lid. I fastened the lid clips, flipped the external toggle switch I installed to “ON”, and watched my voltmeter climb as the ammo can came alive with electricity!
With the battery bank safely housed and ready to deliver 1.7kWh of renewable backup power whenever I need it, this build proves that with some creativity, leftover li-ion cells can be transformed into a useful off-grid power source rather than heading to the recycling bin.
Recharging Laptop Cells for Eco Energy
Wrapping up this journey converting discarded laptop batteries into a Handy backup power bank, let’s recap the key milestones that brought this ambitious upcycling project to fruition:
We started by collecting and insulating 182 leftover li-ion 18650 cells from recycled device battery packs, with each cell providing 3.7V of potential.
After mapping out a wiring plan to link the cells optimally, I connected 26 batteries in parallel to create high capacity segments. I repeated this to make 7 groups of 26 parallel units.
Fusing each parallel build for safety, I interconnected those 7 packs end to end in series. This combined their voltage potential to reach the target 25V system capacity.
With the cells fused and wired in a 7S26P arrangement, I had a robust 72AH/25V lithium-ion battery bank made entirely from reused e-waste!
I finished the build by installing a BMS for protection, enclosing the pack securely in a reinforced ammo can wired with an access port, and activating the system to immediately start supplying renewable power!
Repurposing and “recharging” aging li-ion batteries destined for the dumps breathed new utility into each cell. And forming them into a large-scale pack creates a sustainable emergency backup generator that can be tapped anytime. This project proves that with some basic electronics skills, reusable energy is never far from reach!
While the process requires diligence, the end result is better for both your wallet and the planet. I hope this DIY energy storage journey inspires you to look at cast-off batteries as a valuable resource rather than waste. Let your imagination and a spot welder unlock their dormant potential for green energy solutions!


