
Having access to clean water is incredibly important when you’re on an outdoor adventure or in a survival situation. Dehydration and drinking contaminated water can really put a damper on your trip at best or even put your health at serious risk. That’s why having your own portable, self-contained water pumping and filtration system can be a total game changer.
In this project, we’ll be building a handy little DIY device that can turn non-potable water sources like lakes, ponds and streams into clean, drinkable water on demand. We’ll use a 12V water pump connected to a filter to take water from the source and remove dirt, debris, bacteria and other nasty stuff. The whole system runs off a rechargable battery or solar panel so you can use it anywhere without needing to connect to a water pipe or electrical system.
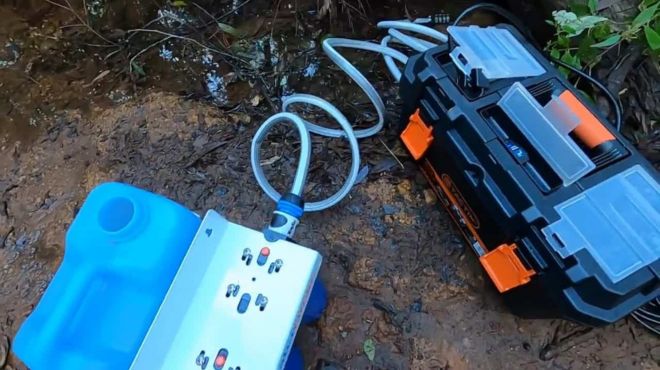
This water pump box with integrated filtration gives you access to purified water no matter where your adventures may take you. Read on and I’ll explain everything you’ll need and all the steps to putting it together yourself. Then you can have peace of mind knowing fresh, clean water is always within reach while camping, hiking, kayaking or during power outages and emergencies. Let me show you how it works!
1. Install Switch and Power Input Plug
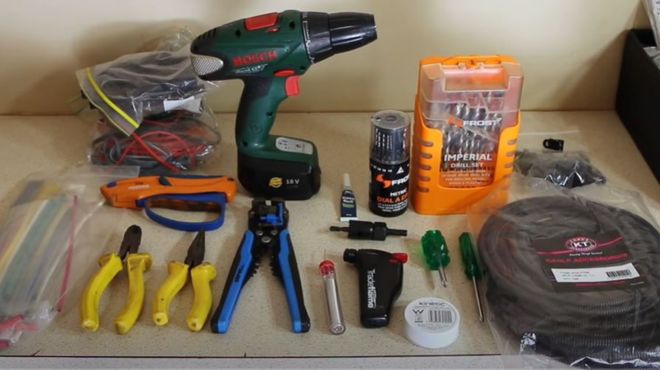
Alright, you’re ready to start building your portable water pumping system! Once you have all the components and tools (which we’ll cover later), it’s time to dive into the key steps.
First things first – we need to be able to easily turn the pump on and off. This involves installing a basic toggle switch on the side of the storage box. Mark where you want the switch, drill holes to fit and mount it in place with some screws or nuts.
Next up is the power inlet. This is where you’ll plug in the battery, solar panel or car outlet to give the pump its juice. Install the inlet near the switch and connect the wires from both to the pump with some alligator clips. Later we’ll solder them for more durability.
2. Connect Wiring for Pump
Now we can hook up the wiring that lets the switch turn the pump on and off. Connect the positive lead from the switch to the positive terminal on the pump. Then connect the negative from the switch to the negative on the pump. Use crimp connectors to secure the wires. Test the switch and make sure the pump turns on and off before moving to the next steps.
The wiring may seem simple but it’s key to making this a portable, self-contained water pumping system. More cool functionality to come!
3. Install Protective Strainer
Now we need to make sure debris and sediment don’t get sucked into the pump and clog things up. For this we’ll install a protective strainer on the inlet side.
Find a narrow plastic container or piece of PVC pipe. Drill a bunch of small holes all around the bottom and sides. Then attach some mesh, fabric or a reusable coffee filter over the outside to act as the strainer.
Secure the strainer over the pump’s inlet using hot glue, cable ties or whatever works. When placed in dirty water, it’ll block twigs, mud and muck from fouling the system. Make sure the mesh holes are small enough to catch debris but big enough not to restrict water flow.
4. Connect Inlet/outlet Hoses
What good is a water pump without hoses? It’s time to connect pipes that direct water in and out of the pump. For flexibility, use food-grade hose reinforced with steel mesh. Standard garden hose works too in a pinch.
Measure and cut inlet and outlet hoses to the length you need. Attach one end of each to the corresponding intake and outlet fittings on the pump using hose clamps. Leave the other ends open for now.
Later we’ll add quick connectors to swap hoses of different lengths. But for initial testing just get the bare hoses hooked up securely. Turn the pump on (carefully) and make sure water flows through without leaks.
5. Securely Mount Pump in Box
Now it’s time to give our water pump a home by securely mounting it inside the plastic storage box. This not only protects the pump when not in use, but lets us carry all the parts as one compact, portable unit.
Place the pump in the center of the box and mark where the screws will go. Drill pilot holes then screw or bolt the pump into the bottom and sides of the box. You may need to drill drain holes too.
Add some foam padding around the pump as insulation. Then bring the inlet and outlet hoses through holes drilled in the sides of the storage box. Silicon sealant optional.
6. Connect Pump to Hoses With Pex Pipes
We need a way to join the pump physically with the hoses bringing water in and out. For this we’ll use flexible PEX tubing.
Cut two short segments of PEX pipe to size. Push a hose barb fitting into each end. Then use hose clamps to securely connect the PEX pipes between the pump and hoses. The barbs provide a tight seal.
And just like that our closed-loop water pumping system is starting to take shape! Make sure all pieces are oriented logically and nothing interferes with closing the box lid. Now we’re ready to clean things up.
7. Attach Filter to Outlet Hose
At this point we can pump water, but we need to filter it to remove contaminants. For that, we’ll install a water filter in line on the outlet hose.
There are lots of filter options out there. For portable use, inline sediment and carbon block filters are ideal. They remove particulates, bacteria, chemicals, viruses and improve water taste.
Simply cut the outlet hose and splice the filter fitting in between using plastic couplings. Run water through and check for leaks. Replace filter cartridges per manufacturer instructions.
8. Connect 10m Cable to Power Source
Almost done! We just need to connect our water pumping system to a power source so it can function on the go. This might be:
- A 12V rechargeable battery
- Portable solar panel charger
- Car battery via cigarette lighter outlet
Measure then cut an outdoor-rated 10m extension cable to length. Attach one end to the pump box power inlet. Use alligator clips for now to test with various power sources.
Once everything checks out with your preferred power source, whip out the soldering iron again and permanently connect the clips. Add some wire sheathing for protection.
Now our water pumping and filtration system is ready to supply clean drinking water in any situation! Pretty cool project if I do say so myself. Let’s talk about the finishing touches…
The Perks: Benefits of a Portable Water Pump
This DIY water pump and filter system has some awesome benefits when you’re out in nature or in a pinch:
- It’s completely portable and self-contained in one box
- Can filter water from lakes, ponds, rivers to make it clean to drink
- The replaceable filter cartridge removes bacteria, chemicals, sediment and odors
- Runs off 12V power from battery, solar or car so works remotely off-grid
- Durable, weatherproof construction stands up to outdoor use
- Provides access to fresh drinking water on demand whenever you need it!
Potential Drawbacks to Consider
Of course no system is perfect. There are a few limitations with this build to keep in mind:
- Requires a bit of set up time connect hoses, power cables, drop strainer in water source etc.
- Smaller pumps have slower flow rates – plan ahead when filling containers
- Length of hoses restricts distance and accessibility depending on terrain
- Pump needs consistent power source to run – battery must be charged, have backup
Wrapping Up
To recap, with some basic tools and parts you can construct your own portable water pump and filtration device from scratch! This self-reliant system gives you on-demand access to clean water off the grid by straining, pumping and filtering source water.
It’s an incredibly handy prep to have on backcountry adventures, camping trips, or just for emergencies like hurricanes and power outages when tap water may be compromised. And you can customize and expand the build to your needs.
Having your own supply of filtered water provides safety, security and peace of mind no matter the situation. Let me know if you have any other questions!


